On Hand™ for iPhone
from Stevens Creek Software
Latest released version: 1.0
Purchase a copy of the software
On Hand from Stevens Creek Software provides a fast and easy way to collect barcodes, perform inventory counts or "pick and pack" operations, or other actions all focused on two questions: what have you got, and how many of them do you have? The software can keep track of this information at multiple locations simultaneously, further enhancing its utility.
Version 1.0 of On Hand can "scan" and recognize three types of barcodes: UPC-A, EAN-13, and CODE128. More barcode types may be added in the future, but these are the three most common barcode types in use, and should handle most needs. You can also enter a barcode using the keyboard, so in that mode barcode types are unlimited.
To test whether the "scanning" of barcodes by this software will be acceptable for your needs, you can download (for free) a copy of the "lite" version of the software, SCS Scan, by clicking here. Although this software lacks most of the functionality of On Hand (multiple fields of information per item, input and output), the "scanning" functionality is identical. Bear in mind that On Hand does work quite well without any use of the camera for barcode recognition at all, and that it's complete functionality is available even on units which do not have an auto-focus cameral
Registering Your Copy of the Software
When you use the software for the first time, on the Input/Output screen (you'll learn how to get there in shortly), we strongly encourage you to tap the "i" Information icon which will give you an opportunity to register your copy of the software with Stevens Creek Software. Doing so entitles you to technical support on the software, and will help us to keep you posted about updates to the software. We hope you will take the time to do that so we can best support you (we get no information about our customers from Apple, so if you don't register, we have no way to know who you are).
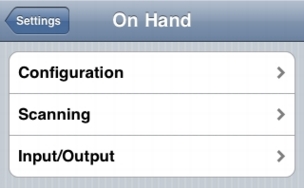
Configuring the Software
The On Hand sections of the Settings application has three sections which let you configure and customize your copy of the software to match your needs:
As we go along in the manual, we'll refer to various parameters which you'll set with the Settings application. When you see the name of a parameter shown in Bold Italics, you'll know it's a parameter that you set with the Settings application.
The Main Screen
The main screen that you see when you open the software, looks like this:
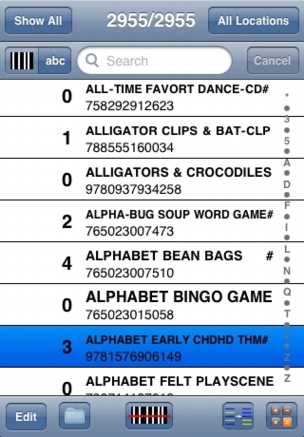
From the top, here's what you see:
Across the bottom are five buttons. From left to right, they are:

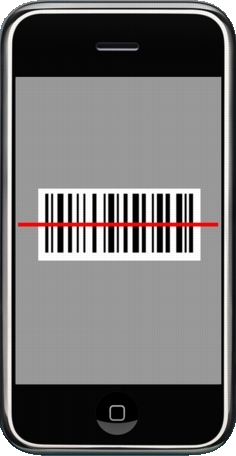
Scanning Barcodes
When you activate the scanner, the camera screen will appear, the shutter will open, and you'll see something like this:
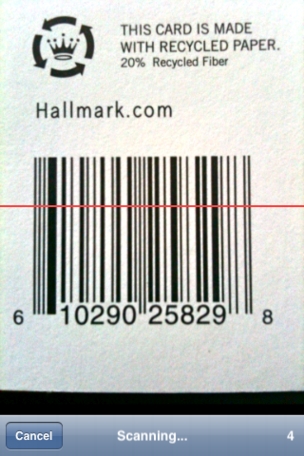
To effectively scan a barcode, position the red line across the barcode. We find the quickest way to get the camera to autofocus properly is to hold the camera quite close to the barcode (so the barcode fills most of the screen), and then pull the iPhone back (away from the barcode) until the barcode fills somewhere between half and three-quarters of the screen. A status area on the bottom of the screen will let you know if the iPhone is "Unstable" (moving too much to focus), or is actively "Scanning..." (trying to read and interpret the barcode); a countdown on the right-end shows the time remaining before the software gives up. Note that you are not "taking a picture" of the barcode; instead, the software is continually examining the screen (in other words, it's looking at what you would be taking a picture of if you actually did take a picture, it just doesn't bother with that last step).
With a little practice, we find that most "full-size" UPC barcodes (measuring a little more than an inch or 3 cm wide) can be recognized in a second or less. Smaller barcodes with finer lines are definitely more challenging, and some are definitely well beyond the focus/resolution capability of the existing camera. We also find that autofocus seems to depend on the background color of the object on which the barcode appears, so a nice black barcode on a white background focuses quickly, but if it is in the middle of a large yellow box (for example), autofocus may be slower.
All scanning is performed with the iPhone in a portrait position. You can turn the iPhone sideways if you like, but scanning still follows the red line along the short axis of the screen.
UPC barcodes can be scanned "right-side up" or "upside-down"; all other barcodes can be scanned "right-side up" only at this time.
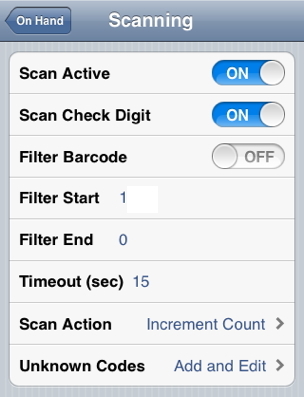
If the software can properly interpret the barcode, a bell will ring and you'll be returned to the main screen. What happens then will depend on the Scan Action and Unknown Codes parameters. If the barcode is found in your database, that item will appear highlighted on screen, with its quantity incremented, decremented, or unchanged, based on the Scan Action. If the barcode is not found, and Unknown Codes is set to Ignore, a warning buzzer will sound. Otherwise, the new barcode will be added to the database and, if Unknown Codes is set to Add and Edit, the editing screen will appear to allow you to add a name and/or note to the item. Finally, depending on the setting of your Time Stamp and Date,Time Format settings, the item may have its date/time parameter updated with either the date or date and time.
If the software can not properly interpret the barcode in the time you have allowed (the Timeout parameter), or if you tap the Cancel button before that happens, the manual entry screen will appear, allowing you to enter the barcode "by hand":
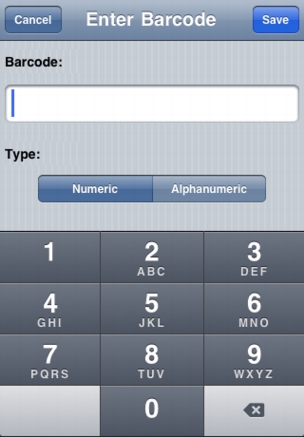
Since most barcodes are numeric, the screen starts with a large numeric keypad to make entry of the barcode easier, and, if your Default Barcode is set to something other than an empty string, those characters will be automatically filled in to start your barcode (again, something you might want if all your products are made by one company, which generally means the first digits — as many as 9 out of the 12 UPC-A digits — will be the same. Note that, while some barcode types (like CODE128) can have dashes in them, UPC barcodes, although they are frequently written with dashes to make them more "intelligible" to humans, actually contain only numbers.
If you do need to enter letters into the barcode (such as for some CODE128 barcodes, among others), just tap the Alphanumeric button, and the keyboard will change from the numeric keypad into a standard alphanumeric keyboard, with which you can enter both numbers and letters (and other characters as well).
Counting Items
When you successfully scan an item, its count will typically be incremented by one (it can also be decremented or left unchanged depending on your settings, but most commonly it will be incremented). If you have more than one of the same item, there are several ways to continue to change the quantity. You could scan the item again if you really wanted to, but that would be unnecessarily time-consuming. The simplest way, if the change is small (e.g., you only have a "few" of the item) is to tap the highlighted item on the screen. Each time you do so, the count will increment (or decrement if that was your setting). Indeed, if you find the item not by barcode scanning but by some other method (scrolling the database with your finger or using the Search feature), you can count items this way on any iPhoneOS-equipped device. Simply tap the item once to highlight it, then tap it repeatedly to increment the count.
What if you want to increment the count by a large number? Perhaps in addition to the 3 or 4 on the shelf there's a box of 50. Clearly you don't want to tap the item 50 times! Instead, tap the calculator button at the lower right and the Calculator screen will appear:
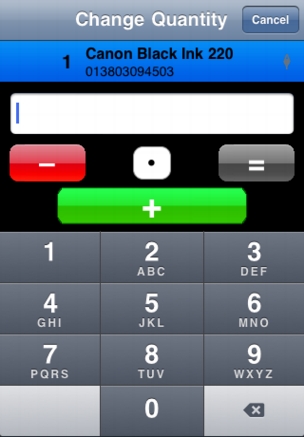
The highlighted item scrolls to the top, and you see a numeric keypad (supplemented by a decimal point, which allows you to use the software to track fractional quantities, e.g., a half bottle of liquor at the bar) and three additional buttons, +, —, and =. To add a quantity to the quantity already counted, just enter the quantity and tap +, e.g., "5-0-+". To subtract a quantity, end with the minus sign (this allows you to decrement quantities even when your "standard" mode is incrementing). Finally, the equals sign lets you set the quantity to a particular amount, ignoring the current count. Maybe you scanned the item and got a count of one, but actually what you were scanning was a barcode on the outside of a box of 16. You could do the (incredibly complicated) math yourself, figure out that you need to add 15 more, and tap "15" and then plus. Or, you can simply tap "16" and then the equals sign. Which is more appropriate in a given situation will be obvious to you.
There is no "Save" on this screen; as soon as you tap the +, —, or = buttons the action will be performed and you'll return to the main screen. Of course you can tap Cancel if you change your mind and don't want to make any changes.
Multi-location counting
If you are keeping track of the same item in multiple locations, the software maintains a separate quantity (and time stamp) for each location. Which location you are working with is governed by the Locations button on the upper-right of the screen. If it reads All Locations, and you change the quantity in one of the ways described above, then the "total quantity" will be changed but not the quantity at any one location. If instead you use that button to select a location, let's say "Storeroom," now the quantities displayed in the table will be the quantities associated with that location only, and any changes to the quantity will be made both to the quantity at that location and to the overall quantity. The software doesn't prevent from adding quantities to All Locations directly, but if you want the total amount at all locations to be the sum of the amounts at individual locations, then you should refrain from doing so, and only change quantities when a particular location is selected.
If the multi-location feature doesn't apply to you, just leave things set at All Locations.
Searching for an Item Manually
In addition to finding an item in the database either by scanning its barcode or by scrolling the database, you can also use the Search Bar. At the left end of the bar are buttons which toggle between the two methods of searching — a "barcode" button to search by barcode, and an abc button which will search by name. Tap in the search box and a keyboard will popup, into which you can start to enter characters to perform your search. If your Default Barcode value is not an empty string, and if you are searching by barcode, those characters will be automatically filled in to start.
Searching itself is a bit subtle because there are two distinct possibilities. If you are searching by barcode, but the items are not sorted by barcode, or if you are searching by name and the items are not sorted by name, then when you have entered enough characters to pick out, say, ten items out of a total of 1000, those ten items will not be adjacent in the database. In this case, the software will filter the display to show only those ten items, with fewer and fewer items displayed as you enter more characters in the search box and narrow the search even further. There's no need to carry the search out until just one item is displayed, however; once you see the item you're looking for (or can scroll to find it), just tap on it to select it and end the search process. In this mode, if your search reaches the point at which only one item in the database matches the search, it will self-terminate with that item selected. So if, for example, items are sorted by name and you type "Q" and there is only one item in the database whose name starts with "Q", you'll immediately see just that one item on the screen, highlighted.
On the other hand, if you search by barcode in a database that is sorted by barcode, or by name in a database that is sorted by name, then all the items which match a partial search are adjacent in the database (e.g., if you're searching by name and enter "THE", all the items starting the "THE" occur one after the other in the database). In this case, the software leaves the entire database displayed, but simply scrolls to display the one(s) which match. This is done because sometimes it will be much faster for you, rather than typing in even more characters in the search box to narrow the search further, to simply look down the list and quickly tap on the item you're interested in. This is actually very similar to the letters which appear down the right side of the screen in On Hand when the items are sorted by name, or that you see in the iPod and Contacts applications (among others). The difference is two-fold: first, there's no ambiguity. With the letters down the right, you might try to tap "N" but get "M" or "O" instead; with the Search Bar, you'll get exactly what you type in. And second, using the Search Bar lets you enter multiple letters, so you can scroll right to the SP's or the SH's without having to scroll though all the S's manually, as you do with, e.g., iPod and Contacts. When you've got thousands or even tens of thousands of items, you'll appreciate the difference!
As you are searching, if you enter characters which will result in no entries satisfying the search, you'll hear a "buzzer" and the last character you entered will be deleted. So for example if you enter "TH" and then "Z", if no items start with "THZ", the "Z" will be removed and you'll be back to a search for things starting with "TH".
Searches by name or barcode always search at the beginning of the name or barcode; there is no search for letters or numbers in the middle of the name or barcode.
Input and Output
In order to move data into or out of the software, you'll first need to use the Settings application:
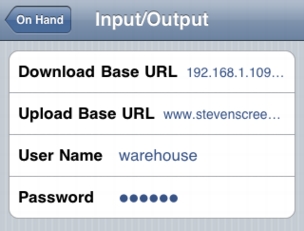
The fields you see are:
Input
With that out of the way, tap the File icon (the folder) on the main screen of On Hand and you'll see the Input/Output screen:
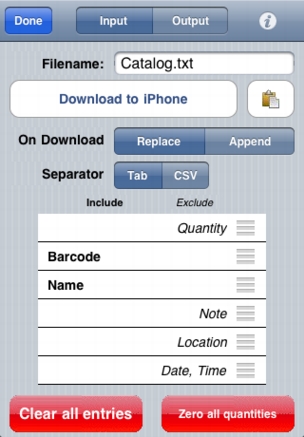
On top is the toggle which shows whether we are configuring (and/or performing) input (downloading) into the software, or output (uploading) from the software back to your company website or desktop computer. In this picture it is shown set to Input. Also on the top line is the Information icon which will give you two choices - read this online manual, or register your copy of On Hand software with Stevens Creek Software.
Filename tells the software what file to download from the folder specified by the Download Base URL setting. Download to iPhone does just that. The Paste icon (the clipboard) gives you another way to get data into the software, by first copying it to the iPhone clipboard in another application (Mail, Safari, or even, and this proves quite useful, from the Note field of a Contact or Calendar item), and then coming to this screen and "pasting" it into On Hand (of course it's not just a simple "paste," as we'll discuss in a second). In either case, as you add new data, you can first clear out the old data (Replace), or you can simply add the new data into the existing data (Append).
The format of the file that you download, or the data that you have on the clipboard, must be a simple text format, consisting of a number of fields, separated by a separator character, which can be either a Tab or a comma (CSV) depending on what you select here as the Separator (CSV is somewhat more complicated because if an individual field, perhaps the name of an item, contains a comma, then that field must be enclosed in quotes in addition to the comma separator; this is of course the standard when using CSV files).
The Include/Exclude table allows you to control precisely what fields are found on each line of the download file, and in what order. To change whether an item is or is not included as part of the download file, just tap on that item, and it will toggle from the Include column to the Exclude column and back. To change the order of items on each line, use the reorder bars on the right side of each item to move the item up or down. In this example, each line in the input file will consist of just two items, the barcode and then the name, separated by a tab. The order of the excluded items is irrelevant; you could drag the Quantity item down to the bottom, but it doesn't make any difference. If you tell the software you are going to import six items per line, but your file contains only four, the software will simply ignore your request to import the final two. However, it is up to you to make sure that the order of the items in your input file does correspond to the order specified by this table; if it does not, then information will end up in the wrong place in the software.
The Location item needs more explanation. If you are doing a multi-location inventory (multiple stores, multiple warehouses, multiple floors, etc.), you may have want to download a file which contains the starting quantity for each different location (this is actually most appropriate for a "pick and pack" application we'll discuss below). In this case, you will have multiple lines containing the same item (name, barcode), but a different quantity and different location on each line. This is actually most typically useful in uploading data (output), so we'll give a specific example in a minute.
At the bottom are two special buttons - Clear all entries, and Zero all quantities. In both cases, the actions are "un-doable", so you will be asked to confirm the action before it is actually performed. Zero all quantities will zero the quantities at all locations if All Locations is specified on the main screen. If a particular location has been selected on the main screen, the Zero all quantities zeroes only quantities at that location.
Output
When you select Output, the screen you see is almost identical:
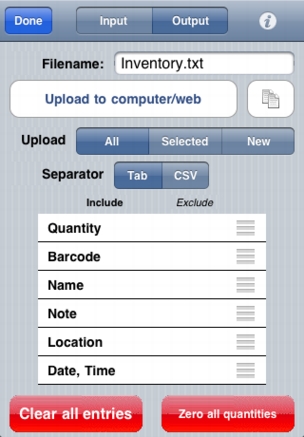
The Upload to computer/web button performs the actual upload; if you have configured the Upload Base URL as an email address, then this button will read Email file and your file will be emailed as an attachment, with the name of the attached file (and the Subject line of the email) specified by Filename. The Clipboard paste icon on the Input screen has been replaced by a Clipboard Copy icon, which allows you transfer the data to the iPhone clipboard, and from there to any other application (e.g., Mail, or perhaps the Note field of a Contact or Calendar item), which is a simple albeit perhaps crude way to transfer data to a desktop computer via a wired Sync. The options for uploading the data are threefold: upload All the data, only the Selected data (based on a selection by quantity or location), or only the New data (data which has been modified since your last upload or download).
In this example, the output file will contain six pieces of information per line, and, because it includes Location, it will actually include multiple lines per item, one for each location which was inventoried, each with its own quantity and date/time stamp. Note that, if you return to the Input screen and configure the Include/Exclude Table identically, you'll be able to download the exact same file you uploaded, with no changes (which may or may not be what you want to do or need to do). To the extent that the two tables are configured differently, either in terms of which items are included or excluded and in terms of their order, you will need to download a completely different file into the software. Of course you can change these formats, so that if your "normal" download consists of only Barcode and Name, as in the example above, you can do that, but if one day you need to download a complete file that you recently uploaded, you can simply reconfigure the Input Include/Exclude Table and then download it.
Configuration Settings
The On Hand Configuration section of the Settings application looks like this:
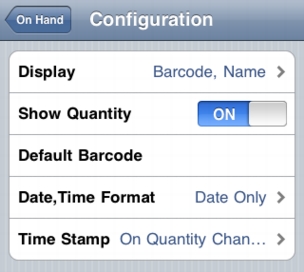
The choices here are as follows:
The choices here are as follows:
Visit the Stevens Creek Software Home Page
Visit the Stevens Creek Software iPhone Software Support Page
© 2010-1 Stevens Creek Software