Stevens Creek Software
Many of our applications for the iPhone, iPad and iPod Touch (from now on we'll just write "iPhone," but all devices apply) allow interchange of information to and from the iPhone. Depending on the application, these files can come from, or be sent to, a website, a computer running a web or ftp server, or, using Apple's File Sharing which was introduced in iPhone OS 4.0 (iOS 4.0), a computer physically attached to the iPhone and running iTunes version 9.2 or higher. This web page attempts to explain the various alternatives that are involved in these transfers.
We begin with the subject of file "encoding." In countries using Latin (also called Roman) characters, simple text files (known as ASCII files where ASCII stands for American Standard Code for Information Interchange) define a series of characters which can be represented by the numbers 0-127. These characters included the standard a-z, A-Z, and 0-9 characters, along with common punctuation (including quotaton marks and apostrophes, for example, but not including "smart quotes" or "curly apostrophes"). With only 128 characters, this requires only 7 bits (2 to the 7th power is 128), but most computers used 8-bits per character to save files, and are capable of storing 256 different characters. This is where "encodings" come in. Let's say to those "basic" characters you want to add some typical Spanish characters like é or ñ, or perhaps Swedish, or Japanese, or Russian, or Hebrew, or Arabic, etc. The historic solution was something called "codepages." On Macs, for example, a typical "codepage" or encoding was (and still is) called MacOS Roman. In this encoding, the letter é is represented by the number 142. On Windows, a common "codepage" or encoding was (and still is) called Windows-1252 (or its close relative ISO-8859-1), sometimes called Windows Latin 1. In this encoding, the letter é is represented by the number 233. You can begin to see the problem, and we haven't even gotten to the non-Latin alphabets! If you open a file, you have to know exactly which of many encodings were used to create it; if you don't, a character which started out as é on the Windows computer you created the file on might end up as an È when you open the file on a Macintosh. A file which started out as Cyrilic characters in Russia could be opened on a computer in the U.S., but when interpreted as Latin characters, it would be complete nonsense.
In recent years, particularly since the rise of the Internet, a new universal standard called Unicode has arisen to (ultimately) replace all of these. The idea is to create a single set of numbers, ranging not from 0 to 255 but over a much larger range (but for our intents and purposes, consider it 0 to 32767), so that every character (and punctuation and symbol etc.) in every language (or at least, almost every language) can be represented by a common set of numbers. In this standard, the character é is always character 233, no matter whether it is generated on a Mac, Windows, or Linux computer, and no matter whether it is generated by a computer in the U.S., or Spain, or Russia. Characters is Cyrilic, or Arabic, or Japanese, etc. each have their own, unique values. Now the only question is, how to put those values into files.
There are several methods of doing so, but the two most common are called UTF-8 and UTF-16, the latter sometimes being referred to simply as Unicode. UTF-16 uses one 16-bit word to hold a character, whereas UTF-8 uses a variable scheme of one to four bytes (8 to 32 bits) to represent a character. UTF-16 is evidently more straightforward, but for Western languages using the Latin alphabet, it will always take up more space. UTF-8 is more complicated (but that's the computer's problem, not yours), but it has one huge advantage – if your file has no accented characters, and no characters in non-Latin alphabets, a UTF-8 file is 100% identical to a simple ASCII file of the type that has been in use (in the West, at least) for decades. UTF-8 has one more advantage, as well, which is that the current version of all web browsers is capable of recognizing web pages which use UTF-8 encoding, and hence capable of displaying multiple languages on the same page, like this: 互可丕丗 (no, we have no idea what that means!).
How does this apply to iPhone software from Stevens Creek Software? Our standard is that for output from the iPhone, we use UTF-8 encoding. If there are no accented characters or non-Latin characters, you'll be able to open and read and modify this file using any program capable of simple text editing, because it will be identical to a simple ASCII file. If there are accented characters or non-Latin characters, then you must open it (and modify it) using a program capable of handling UTF-8 files. Current versions of TextEdit on the Macintosh (the standard simple text editor included on all Macs) and Notepad (but not Wordpad) on Windows (the standard simple text editor included on all Windows computers) are capable of reading and writing UTF-8 files. With TextEdit (Macintosh), there is a preference which you can set (under Open and Save) where you specify the default encoding for files you open and files you save. When you save a file, there is also a pull-down list in the dialog box which appears where you can specify the encoding of the file. Notepad on Windows will open UTF-8 files with no special settings required, and when you save files from that application, you can specify the encoding for saving them as UTF-8.
Most of our iPhone applications will open files which have been saved in either ASCII, UTF-8, or UTF-16 formats. In general, however, we recommend that if you are preparing files on the computer for transfer into the iPhone, you should stick with UTF-8. If you are saving a file to transfer to our software on the iPhone from an application which does not allow you to specify the encoding, perhaps a database or spreadsheet program, and if the program contains either accented or non-Latin characters, you are most likely saving it in a "codepage" which our software won't be happy with. Before attempting to transfer it into our software, you should open it with either TextEdit (Mac) or Notepad (Windows) and then re-save it as a UTF-8 file. If the file does not have any accented characters or "smart" punctuation, but just plains Latin characters and "simple" punctuation, then saving it as a "plain" file will be fine, because that file will be both ASCII and UTF-8 simultaneously.
If you need to open a file that has come from one of our iPhone applications with a program which does not understand UTF-8 encoding, but only opens simple ASCII files, the worst thing that will happen is that some of the accented characters will be changed, often into strange two-character combinations. For example, an ñ character might be transformed into this: √±. All the other characters in the file, however, will be unaffected. As an alternative, you can simply open the file first with a program that does understand UTF-8 (TextEdit or Notepad), and then save the file as either MacOS Roman (if you're on a Mac) or Windows Latin1 (if you're on Windows). Then that file should open properly with the program which can't read UTF-8 files.
There's one more problem with text files which has to do with line endings. Macintosh, Windows, and Unix (Linux) computers all use different character or characters at the end of a line and, just to complicate matters, they all have names which originate with typewriters which practically no one uses any more! On Macs, a line is ended with a "carriage return" or "CR" character, which "in principal" (by analogy with the typewriter) should actually only take you back to the beginning of the same line. On Unix (Linux), the "line feed" or "LF" character is used, which again by analogy with a typewriter "should" only move down to the next line, but not back to the left end. And finally, Windows systems use both characters in combination (carriage return–line feed or CRLF) to mark a new line. These differences account for the fact that if you open a Windows text file on a Mac, each line will be separated vertically (because of the CR), but will start with an "open box" (a character which is displayed as a default when the computer doesn't know what else to display) which is the extra LF character used by Windows. Conversely, if you open a Mac text file on Windows, the beginning of each new line will simply follow the end of the previous line (again, separated by an open box), rather than appearing on a new line on the screen, because Windows hasn't seen the CRLF it is expecting, but only the CR portion.
How does this apply to iPhone software from Stevens Creek Software? For output from our software, the software needs to know what kind of computer you are transferring the file to, and for the applications where that is relevant, you specify that in the iPhone Settings application in the section appropriate for that software. That way, when you open the files on your computer, lines will appear properly, one after the other, with no strange open boxes. For input into the software, it's much easier. Our software all recognizes all three possibilities, and handles them all identically, so no matter what the line ending character or characters of the file you've prepared on the computer, when they transfer into the iPhone, they'll be equivalent.
Most of our software for the iPhone supports multiple ways to transfer information to and from the application. For input, it can read files from the web (or a local computer running a web server), some of our software can read information that you have copied onto the iPhone clipboard, and finally, if your iPhone is running iPhone OS 4.0 or higher and your computer is running iTunes 9.2 or higher, you can transfer files from desktop to iPhone via Apple's File Sharing. For output, our software supports uploading files to the web (and suitably configured local computers) via ftp (file transfer protocol), via the iPhone clipboard, via email, or via Apple's File Sharing. We'll discuss each of this methods here.
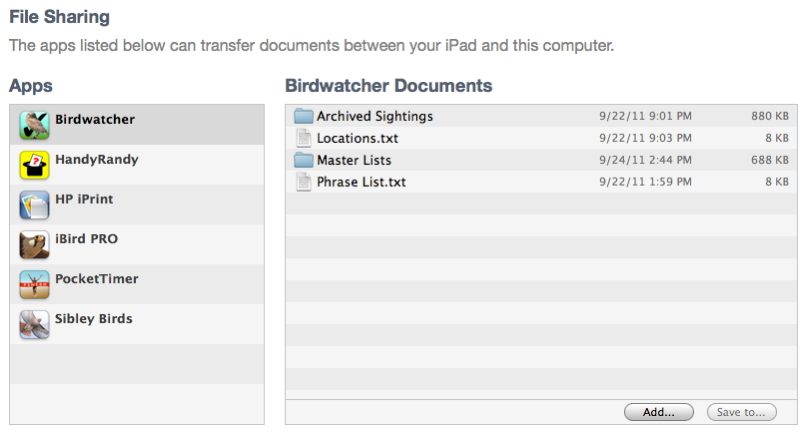
In iTunes (version 9.2 or higher), when you select your iPhone in the left (under "Devices"), and then select the Apps tab on the top of the screen, on the bottom portion of the screen you'll see a section entitled "File Sharing."
On the left will be a list of applications which support file sharing, including those of our applications which have been so enabled. Click on the name of the application, and in the right-hand column you'll see a list of the files on the iPhone that you can upload to your desktop. To upload a file, select it, tap the Save to... button, and specify the desktop computer location where you want the file or folder stored. At this time, iTunes doesn't support opening folders, so if there is a folder containing multiple files, it must be uploaded in that form, meaning that all the files in the folder will be uploaded to the desktop.
To transfer a file into the iPhone, tap the Add button and select the file from your computer to transfer to the iPhone. Note that each application which supports file sharing has its own private directory of documents, so you must make sure the appropriate application is selected before clicking on Add.
In some cases, our applications will store their "standard" files in this accessible location (again, with each application having its own private directory), so you can transfer them to the desktop (and, for example, share them with other users of the software who could them transfer them back into their iPhone). In other cases, files will only appear here when you actively save them for transfer, or conversely can only be read in once you transfer them here. Our standard technique for transferring files to and from, e.g., the web, is to use parameters (specified in the relevant section of the Settings app) called Upload Base URL and Download Base URL which describe the folder on the web to which the file will uploaded (outut) from the iPhone or downloaded (input) into the iPhone. Our convention is that if these parameters are not of a form like www.mywebsite.com/myfolder but rather read simply local or iTunes (they are both equivalent, so use whichever makes the most sense to you), then the file is saved to (if the Upload Base URL is local) or retrieved from (if the Download Base URL is local) the iTunes accessible folder. In other applications, the appropriate input or output screen will have a Read or Write button which accomplishes the same thing. Thus you can save a file to this folder, go into iTunes, transfer it to your computer, read and modify it there, transfer it back into this folder, and then retrieve the modified file into the application on the iPhone.
Some of our applications save related files into sub-folders. Unfortunately, Apple's file sharing doesn't let you "open" those folders to read or write individual files from within those folders. You can Write the entire folder (and all the files it contains) from the iPhone to your computer, which can be useful for backup, but you can't Read an entire folder back in to the iPhone.
Many of our programs can also download files from "the web." "The web" is in quotes there because there are really two different "webs" - the "World Wide Web," from which everyone can download information (be they web pages or simple files like pdf or text documents), and a private web which generally means one of your own computers which is on the same internal network (local-area network or LAN) as your iPhone. Downloading files from the World Wide Web is straightforward; simply set (in our programs to which this applies) the Settings parameter Download Base URL or Parent URL to the location where the file is found, e.g., http://www.stevenscreek.com/iPhone, where the http:// is optional, as is a terminal "/", and in general what you enter is case-sensitive (that is, www.stevenscreek.com/iPhone/ would work fine, but www.stevenscreek.com/iphone will generally not work). Then you set the filename parameter to the name of the file you want to download. The biggest "trick" in this case will be getting the file to the website in the first place. If you're download a file from our website, or someplace else where the file already exists, this obviously isn't a problem, and if you already manage a website and are familiar with uploading files to it, you're all set. If that isn't the case, you'll need to learn how to do it; it's outside the scope of this document.
The alternative to downloading files into your iPhone from the World Wide Web is, as mentioned above, downloading via the same "http" method (protocol), but from your own computer. To do this, your computer must be configured as a "web server," just like a "regular" web site, but only accessible on your own local network.
Configuring and testing a web server on your computer:
On Macintosh OS X: a web server is active if you go to the Sharing portion of the System Preferences, and check the box next to Web Sharing. If you have a Mac on which OS 10.5 or 10.6 came installed, this is all you need to do. If you have a system which was upgraded from an earlier OS (e.g., 10.4), there may be a problem. Here's how to test whether you're ready to go and how to proceed: when you go to Sharing under System Preferences and click on Web Sharing, you'll see something like this: "Your computer's website: http://192.168.1.109/", and underneath that, "Your personal website: http://192.168.1.109/~yourname/". Click on the first one and your web browser should open a default web page, which is Macintosh HD:Library:Web Server:Documents:index.html. Go back to the System Preferences screen and this time click on the "your personal website" URL. If you see another default web page (this one is Macintosh HD:Users:yourname:Sites:index.html), you're good to go. If instead you see a "Forbidden 403" message, you have a known "permission problem," for which Apple describes the solution here. The solution is fairly straightforward, involving just following some simple instructions, but no doubt some of you will find them intimidating. You have two options. If you either didn't encounter the "403" problem in the first place, or if you choose to fix your system by following Apple's instructions, then your "web home" directory will be Macintosh HD:Users:~yourname:Sites, and you'll be placing your files into that directory (folder) for downloading into the iPhone. If you did encounter the "403" problem, and choose not to fix it, you can still download data, but in this case, your "web home" directory will be a "system" folder, Macintosh HD:Library:Web Server:Documents. This is perfectly fine, even if it's not the "approved" location.
On Windows Vista or Windows 7: The IIS (Internet Information Services) server is a standard part of Vista and Windows 7 (and XP Professional), but not installed. Instructions for installing it can be found in a number of places on the Internet, such as this one. Use the web browser on your desktop computer to verify that your web server is functioning.
On Windows XP: A web server is not included with XP. However, the Apache web server, the most widely used server on the web, is freely downloadable and easily installed and configured. These instructions for doing so are quite easy to follow; the only "trick" we found is that, when using Notepad to edit the httpd.conf file, you need to make sure you tell Notepad to show all files, not just ".txt" files, or you won't see the file you're looking for. Once the web server is installed, use the web browser on your desktop computer to verify that your web server is functioning.
To verify you've got a web server running properly and that you can access it from your iPhone, use Safari on the iPhone and enter the URL of a file you will be downloading, e.g, http://192.168.1.109/~yourname/MyLog.tad (on a Mac) or http://192.168.1.109/MyLog.dat (on Windows, or on a Mac in which you are using the system level folder). Because the files you are testing for input into our software are simple text files, Safari will display them as simple text, and you'll have confirmation that your server is working and you'll be able to download the data properly. If you are going to place your log in a subdirectory, you either want that subdirectory to have a name not including a space, or, if you do so, you need to use "%20" in place of the space, because Safari (or any web browser) doesn't accept spaces. So if the subdirectory is named My Logs, the URL you would need to enter in Safari (which doesn't accept spaces) would be http://192.168.1.109/My%20Logs/MyLog.dat (using the Windows example).
Once a web server is running, you can proceed. In the Settings application, the Download Base URL or Parent URL contains the URL (without the "http://" part) where the file you wish to download is located (192.168.1.109/~yourname or 192.168.1.109 using the examples above).
Sending files to the web (again, either the World Wide Web or your own private web) is very different from download files from the web, because as a general rule, files on the web are accessible to anyone with internet access to that computer, whereas saving new files on that computer requires appropriate permissions and passwords. Rather than the HTTP (HyperText Transport Protocol) method used to download (read) files, uploading or writing files uses a protocol called FTP (File Transfer Protocol). If you are uploading files to a "real" web site that you manage, you're already familiar to this, whether you use an ftp client or a program like Dreamweaver to upload files to your web site, so you'll understand the appropriate value to use for the Setting we call Upload Base URL or Parent URL, as well as the Username and Password Settings. And if you're not the primary manager of the web site in question, you'll be able to get that information from the website administrator.
Uploading files via FTP to your own computer on a local network requires that you first configure that computer as an "ftp server." With a Macintosh if you bought a new computer with OS 10.5 or 10.6 installed, you only need to go the Sharing portion of System Preferences, turn on File Sharing, click the Options button after selected File Sharing, and make sure Share Files and Folders Using FTP is checked. If your computer's OS was upgraded, there is a bug which prevents this from working; this page describes what you need to do to make your system work. On Windows, there are various free and paid FTP servers you can (and must) install; FileZilla is one such program that we have tested (but we aren't in a position to make any particular recommendations in this area).
If you decide to use FTP for file upload, you enter an Upload Base URL or Parent URL, a User Name and Password, as well as a name for the file. On a Macintosh desktop, the subtle confusion is that the "base" for this URL is different than it was for the download (sigh!). Pointing to the same directory described above in the downloading section requires you to enter 192.168.1.109/Sites into the Upload Base URL (You don't need the ~yourname portion because the Macintosh assumes that from the User Name, but you do need the Sites because the base location for ftp transfer is your home directory itself, not the Sites sub-directory). On Windows, this is typically not the case, and Download Base URL will be the same as Upload Base URL (assuming you are uploading and downloading to and from the same folder).